
Legions Imperialis Painting Guide
As our Bolters at Dawn staff and officers take a bit of well deserved rest after an absolute rager of a BOLTERCON, one of our club members has stepped up to bring the joy of tiny hammer hobby to us. The indomitable Eric B. has taken time to write up this post, and it couldn’t be more well timed – our EXTREMELY BLESSED VIP registrants at BOLTERCON got a bit of Legions Imperialis swag in their gift bags! So as we force yet another game system into the club, let’s learn from a seasoned tiny hammer hobby enjoyer.
Without further ceremony, I’ll turn things over to Eric!
Why Paint Tiny Hammer?
While “being able to play the game” is an obvious answer, there are so many more reasons to paint a tiny Land Raider, Leman Russ or Space Marine. Legion Imperialis (or tiny hammer as we affectionately call it), amplifies one of the most enjoyable aspects of army painting–the spectacle.
Being able to field a fully painted army at this scale makes each unit feel part of a complete experience. This is especially true since models are available in affordable multiples whereas those same models could cost hundreds (or thousands) to acquire a single one at 28mm scale. Take a gander at a recent battle between my Sons of Horus and Mike’s Imperial Fists.
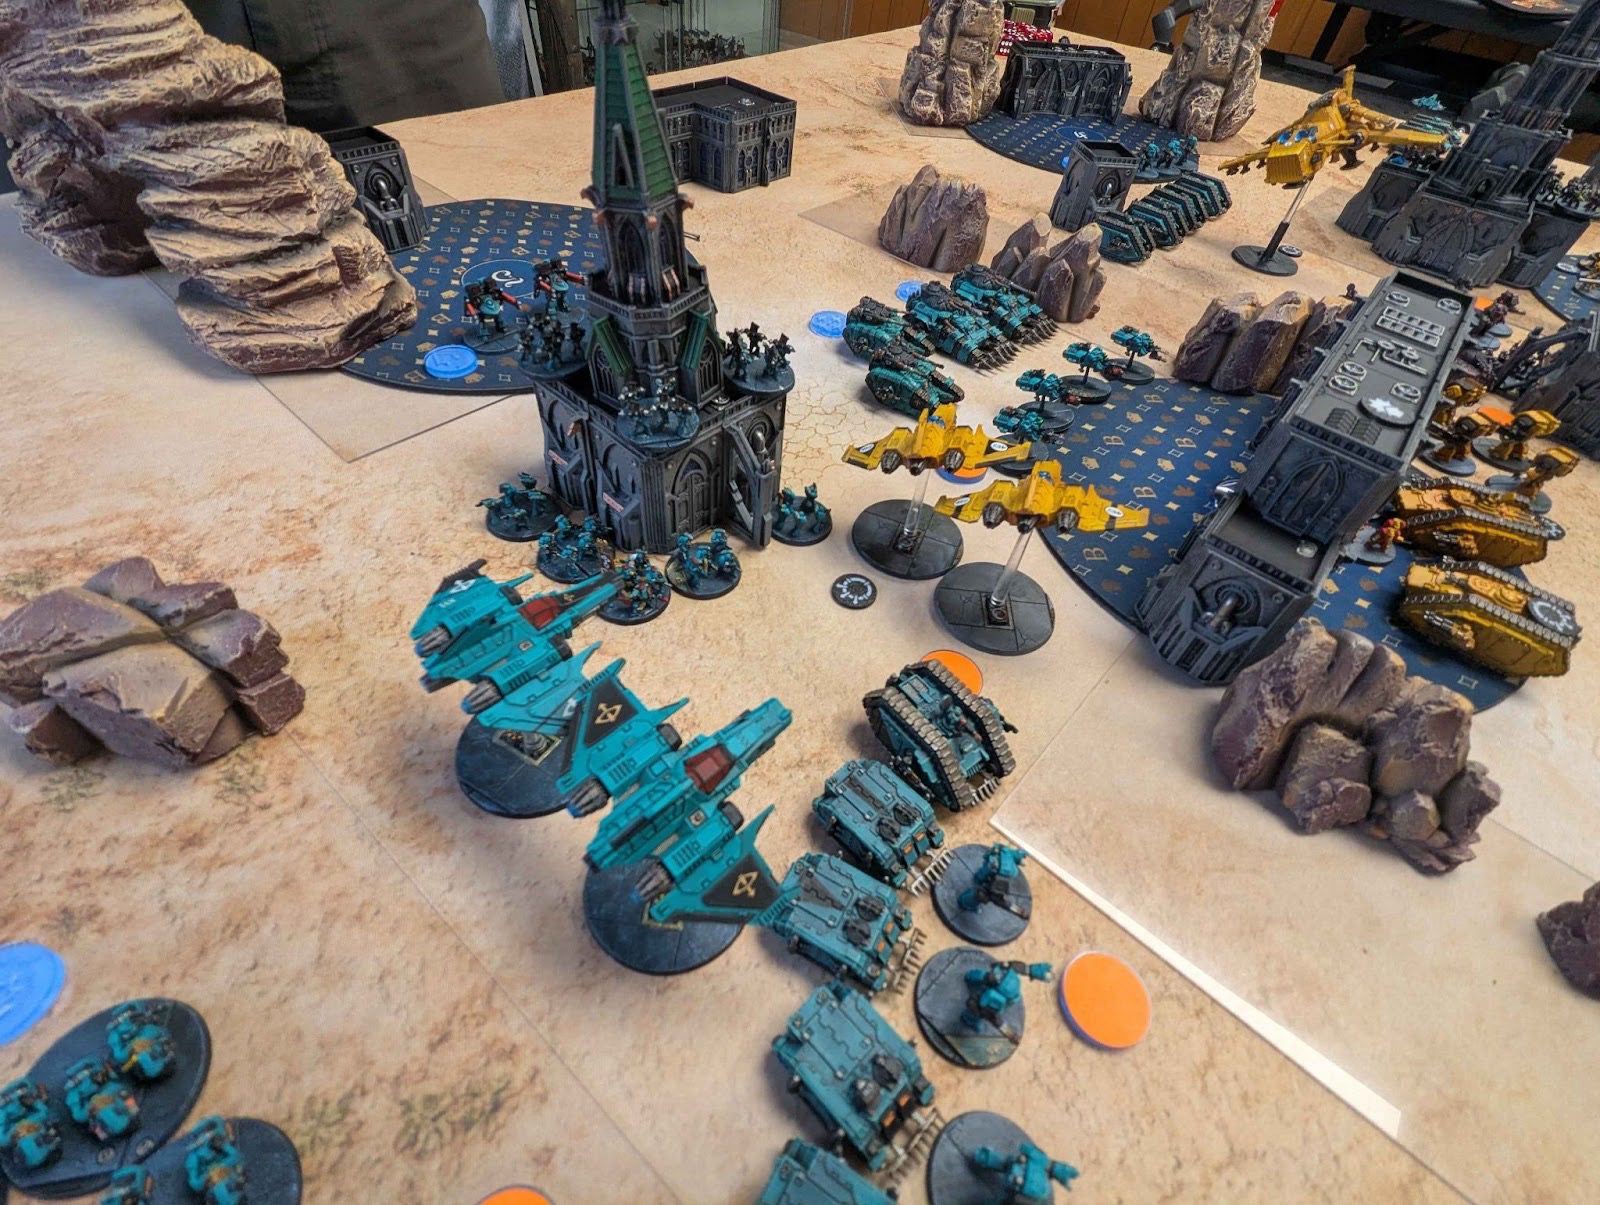
There are multiple Xiphons flying strafing and intercept routes as a Thunderhawk zooms in to rake a line of exposed Kratos and Sicaran tanks. Meanwhile, the demi-company of 50 Sons of Horus in the green-spired building are about to bite the dust when a Reaver’s apocalypse missile barrage reduces the structure to rubble. You can’t easily get this experience in 28mm Heresy or Warhammer 40k.
From the lowly tech thrall swarm to mighty god-engines, you can make a combined arms force that is a joy to paint and play. While the game has its warts (including list building complexity), it is focused on fielding narrative formations of troops, vehicles, fliers and other war machines. Within the Space Marine list of formations alone, you can paint up an Aerial Assault formation to deliver your tactical marines in Stormbirds or let your assault troops hot drop from Thunderhawks. Armored spearheads of terminator-laden Spartans and Land Raiders can push up a flank to deal a devastating blow to dug-in defenders. You can easily play or ally-in formations of Solar Auxilia, Mechanicum (normal and Dark varieties), Knights and Titans.
It is also relatively quick to paint up your army, and field the 2000 or 3000 points typically seen in games. This lets you lean further into narrative campaigns by having a flexible Order of Battle ready to listbuild for the unfolding story. If you’re facing a narrative mission where your army is defending a bastion, you might paint up some rapier batteries, Deredeo dreadnaughts or missile troops for a Garrison formation. Alternatively, siege formations can take advantage of plastic Mastodons, Cerebruses and Typhons. Such campaigns can be purely played in Legions Imperialis, or they can be used in conjunction with Horus Heresy Age of Darkness 3.0 and Zone Mortalis to focus on different scales of conflict. We’re doing exactly this in the Shattered Frontier of Nox Aurelia during this year’s BOLTERCON!
If you’re into the visual spectacle of a combined arms force or the narrative possibilities of the game system, the payoff for painting an army is huge. Also, if you just want to paint and collect tiny tanks or titans, then more power to you! In fact, I recently purchased some Solar Auxilia Leman Russes to test color schemes at a small scale before committing at the 28mm scale.
Whatever your goal, this article is going to kickstart your journey of painting tiny hammer.
Different Scale, Different Approach
At a roughly 8mm scale, you will be painting far more individual models than for the same points limit of 28mm systems like Warhammer 40k, Age of Sigmar, etc. Let’s see the spectrum of miniatures you could face at this small scale:
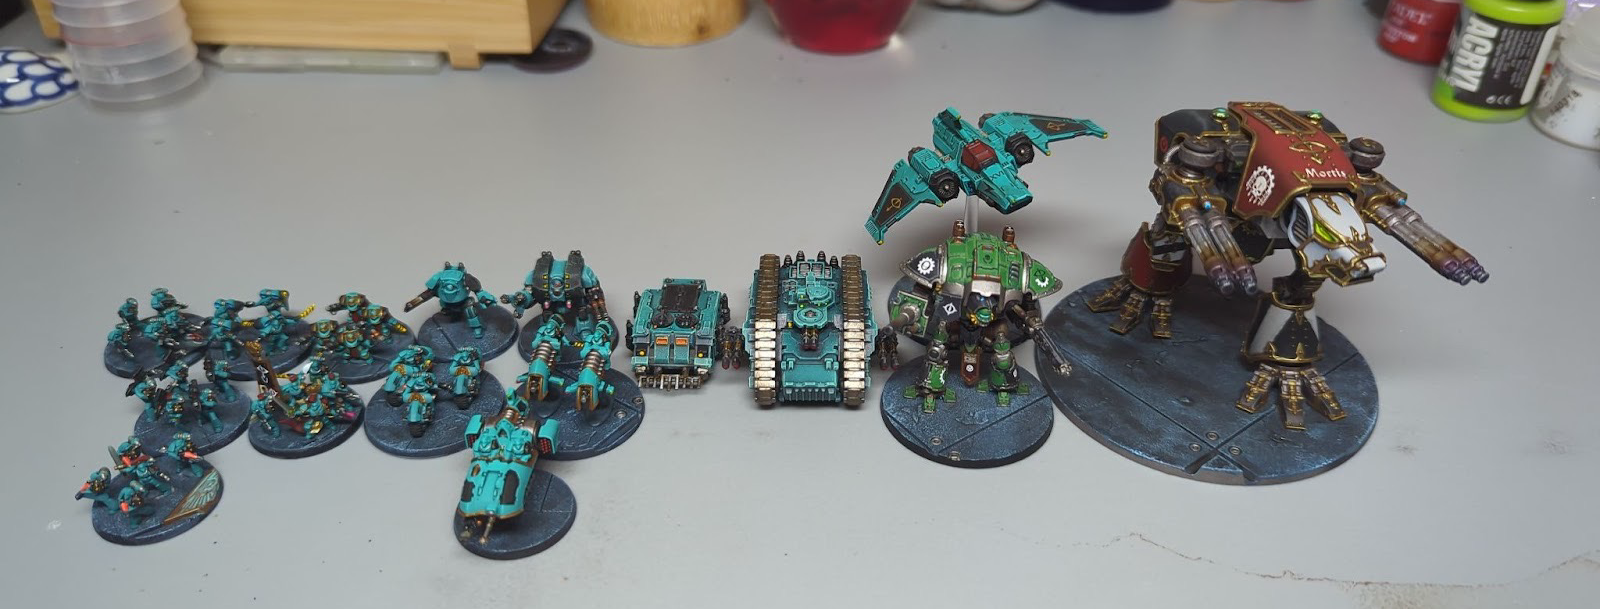
You cannot expect to maintain the same level of effort per-model as those larger-scale systems. The level of effort you should spend painting each unit increases from left to right. Titans are such singular pieces that it makes sense to spend more time on them. For the standard bolter marine, I generally try to speed run them and don’t look back on mistakes. Tanks are the middle ground where mistakes are more noticeable and fixing them is worth it. However, tanks don’t need paint on their hull bottoms. Choose your battles! If people will see a section on a regular basis (i.e. the underside of a flyer), then paint it. If not, keep it simple and move on.
When tackling tiny hammer, there are 3 adjustments to your typical painting and assembly routines:
Preparing Your Miniatures – how to mount miniatures for painting success
Color Schemes & Basing – make your tiny miniatures pop on the battlefield
Using Common Techniques – where to use airbrushing, dry brushing, etc.
Building & Prep for Painting Sanely
Okay, you can just clip 5 Space Marines off their sprue and glue them to their 25mm base, right? Wrong. Welcome to a world of pain when painting like that. Leaving infantry on the sprue is an option, but it is neither ergonomic nor useful for vehicles. Ergonomics here are super important. You will battle your detail brain when painting Legions Imperialis and long painting sessions on tiny dudes can be bad without proper prep or breaks. Hand cramps suck. Preparing each type of miniature correctly will make the process smoother and thus quicker too.
In this section, we will talk about what to leave on vs. off the sprue, subassemblies and mounting with double-sided tape. The specifics depend on the model type, so let’s dive in.
Prepping Infantry, Walkers, Bikes & Speeders
For anything in this category, I recommend clipping everything off of the sprues. For non-infantry models, some assembly will be required. Do your best to get mould lines off larger surfaces. Next, create a painting stick using a plastic soda bottle cap, super glue, a popsicle stick and most importantly–double-sided tape. I use this 0.39” wide tape for reference.
The bottom mounting device is just a popsicle stick super glued onto the bottle cap. The top is a weird triple stacked assembly meant for 2 tanks as we’ll discuss in the next section.
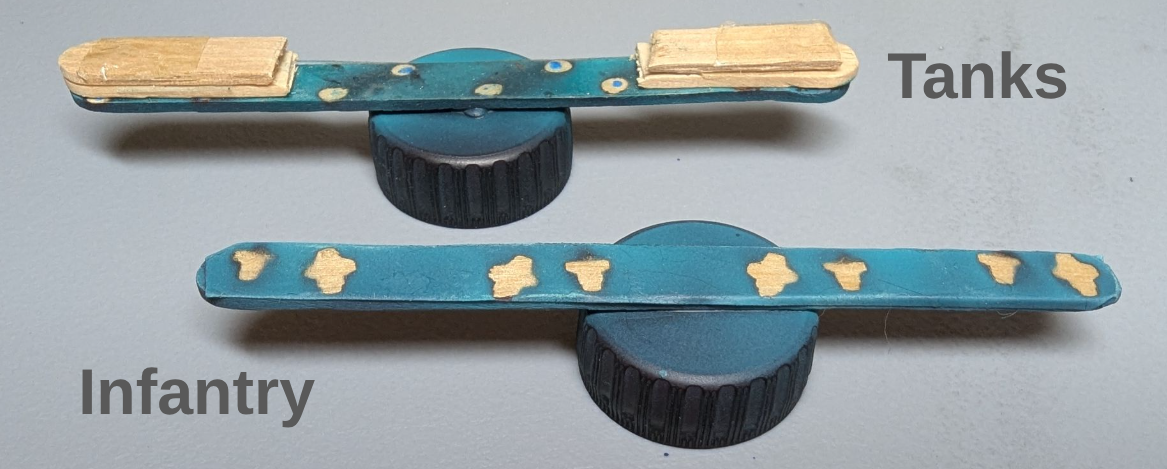
The bottle cap should be sturdy and not bend to pinching pressure. That way, you can slot the entire assembly on a painting handle for max ergonomics. On top of the popsicle stick goes the double-sided tape, which is perfect for mounting infantry, bikes, dreadnaughts and almost anything other than titans or flyers. For example, a line of infantry looks like the following when mounted:
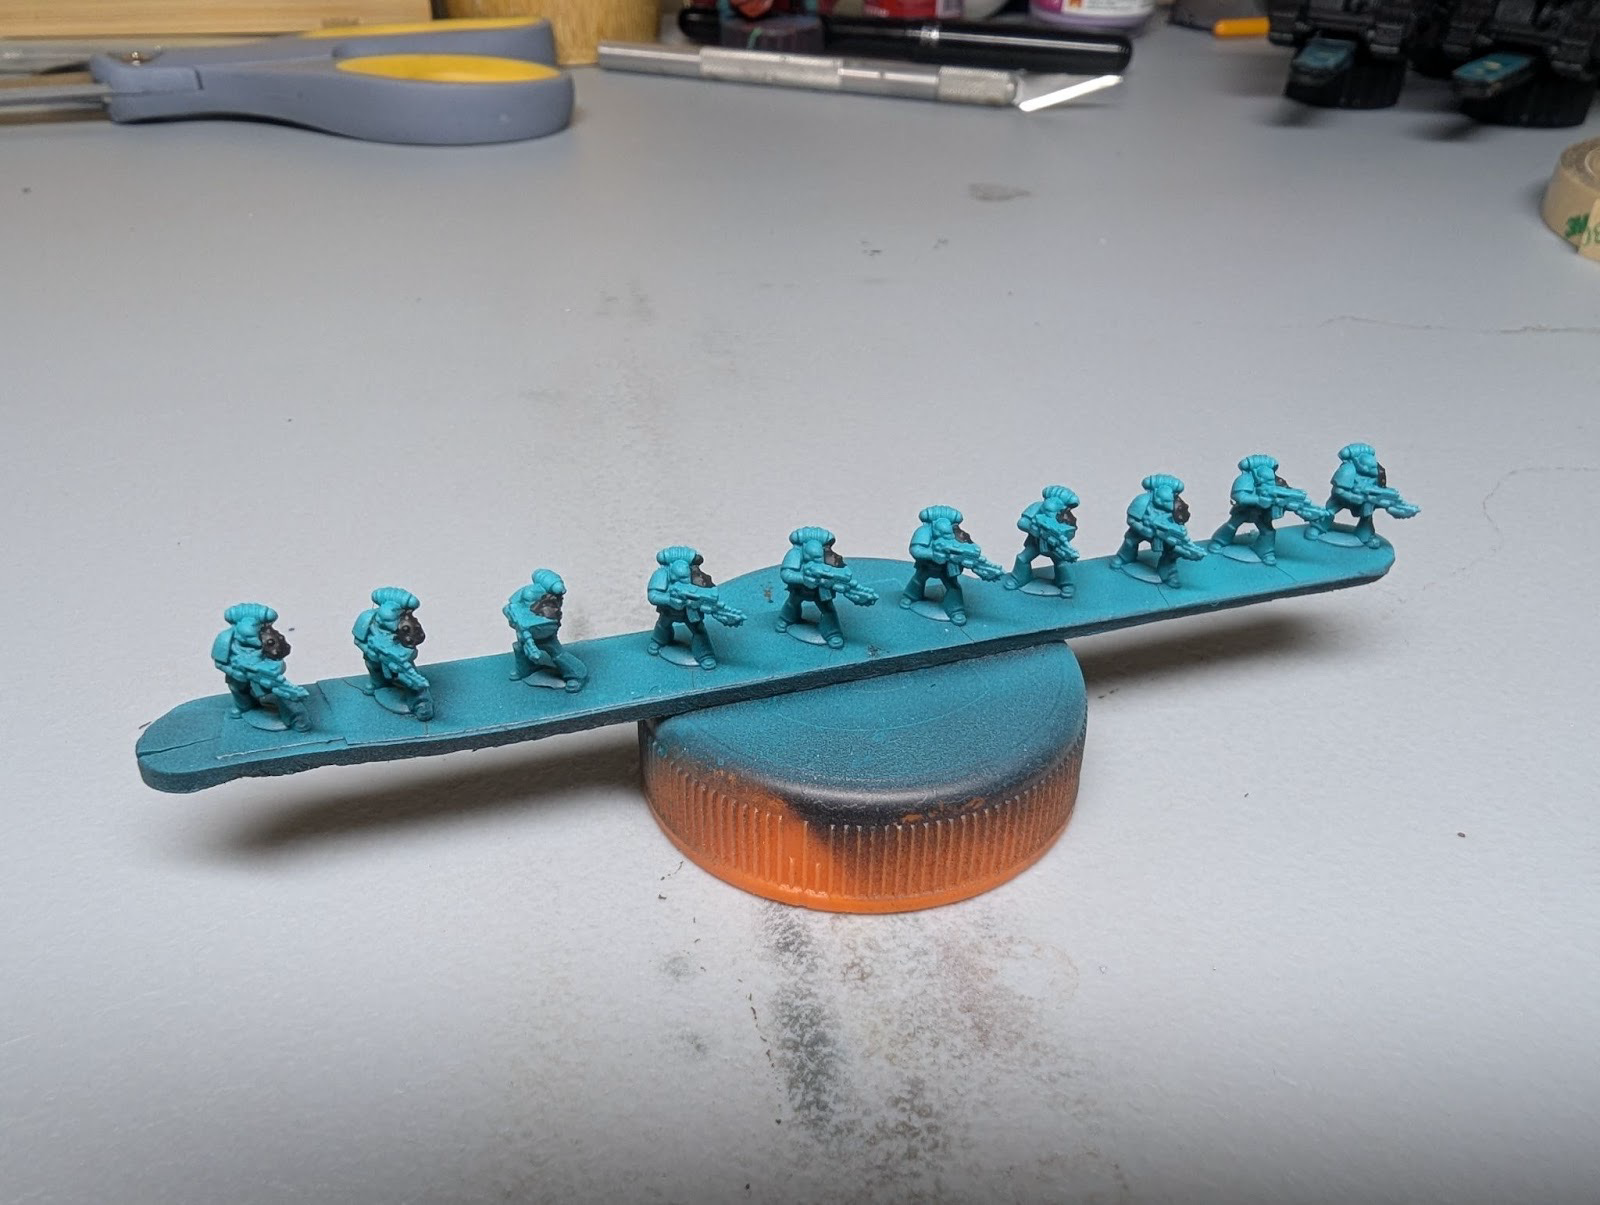
In this case, I had to use a Gatorade cap, which wasn’t able to slot into the painting handle, but it still gave me a place to hold and pivot while painting.
When mounting infantry or other units like this, make sure they a.) face the same direction, b.) have enough room between them and c.) similar loadouts are next to each other. All of this minimizes context switching and maximizes batch efficiency.
Prepping Tanks
Tanks are another huge category of vehicles you can deploy to the battlefield. They take some additional considerations to make the painting process as smooth as possible. First is what to take off the sprue. Generally, everything can come off the sprue, but in the case of the exhaust pipes on Rhinos, hatches, or hunter killer missiles, it is best to leave those on the sprue. For my scheme at least, I painted those black. Regardless, leaving them on the sprue means that the side of the tank hull is mostly flat and easy to paint with airbrushing or sponging techniques.
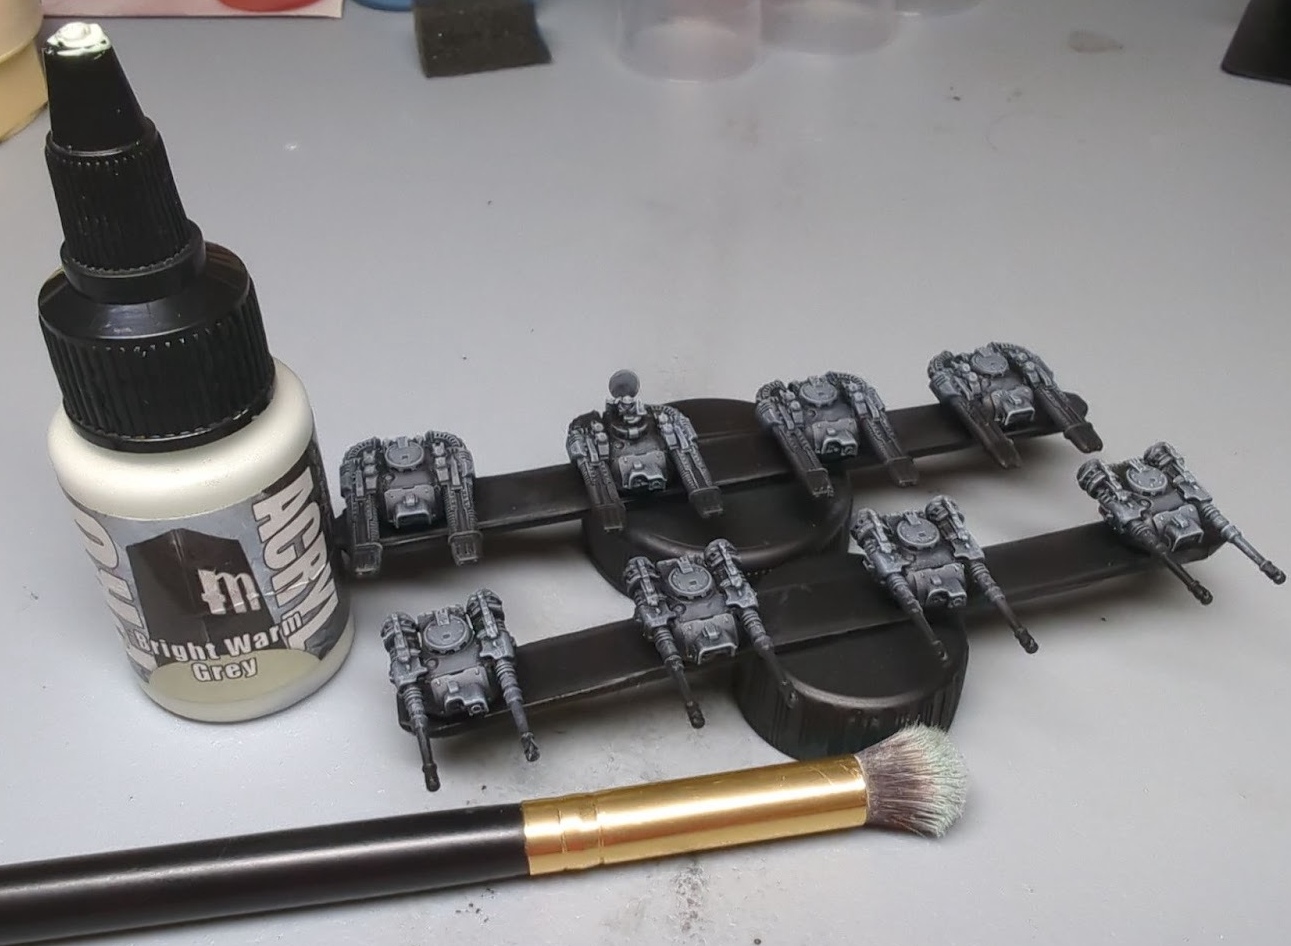
Next up is sub-assemblies. It may seem ridiculous to sub assemble at this scale, but it will let you mindlessly mash makeup sponges onto the model (or airbrush) later. Take a set of Sicaran tanks for example. I built them and mounted them as follows:
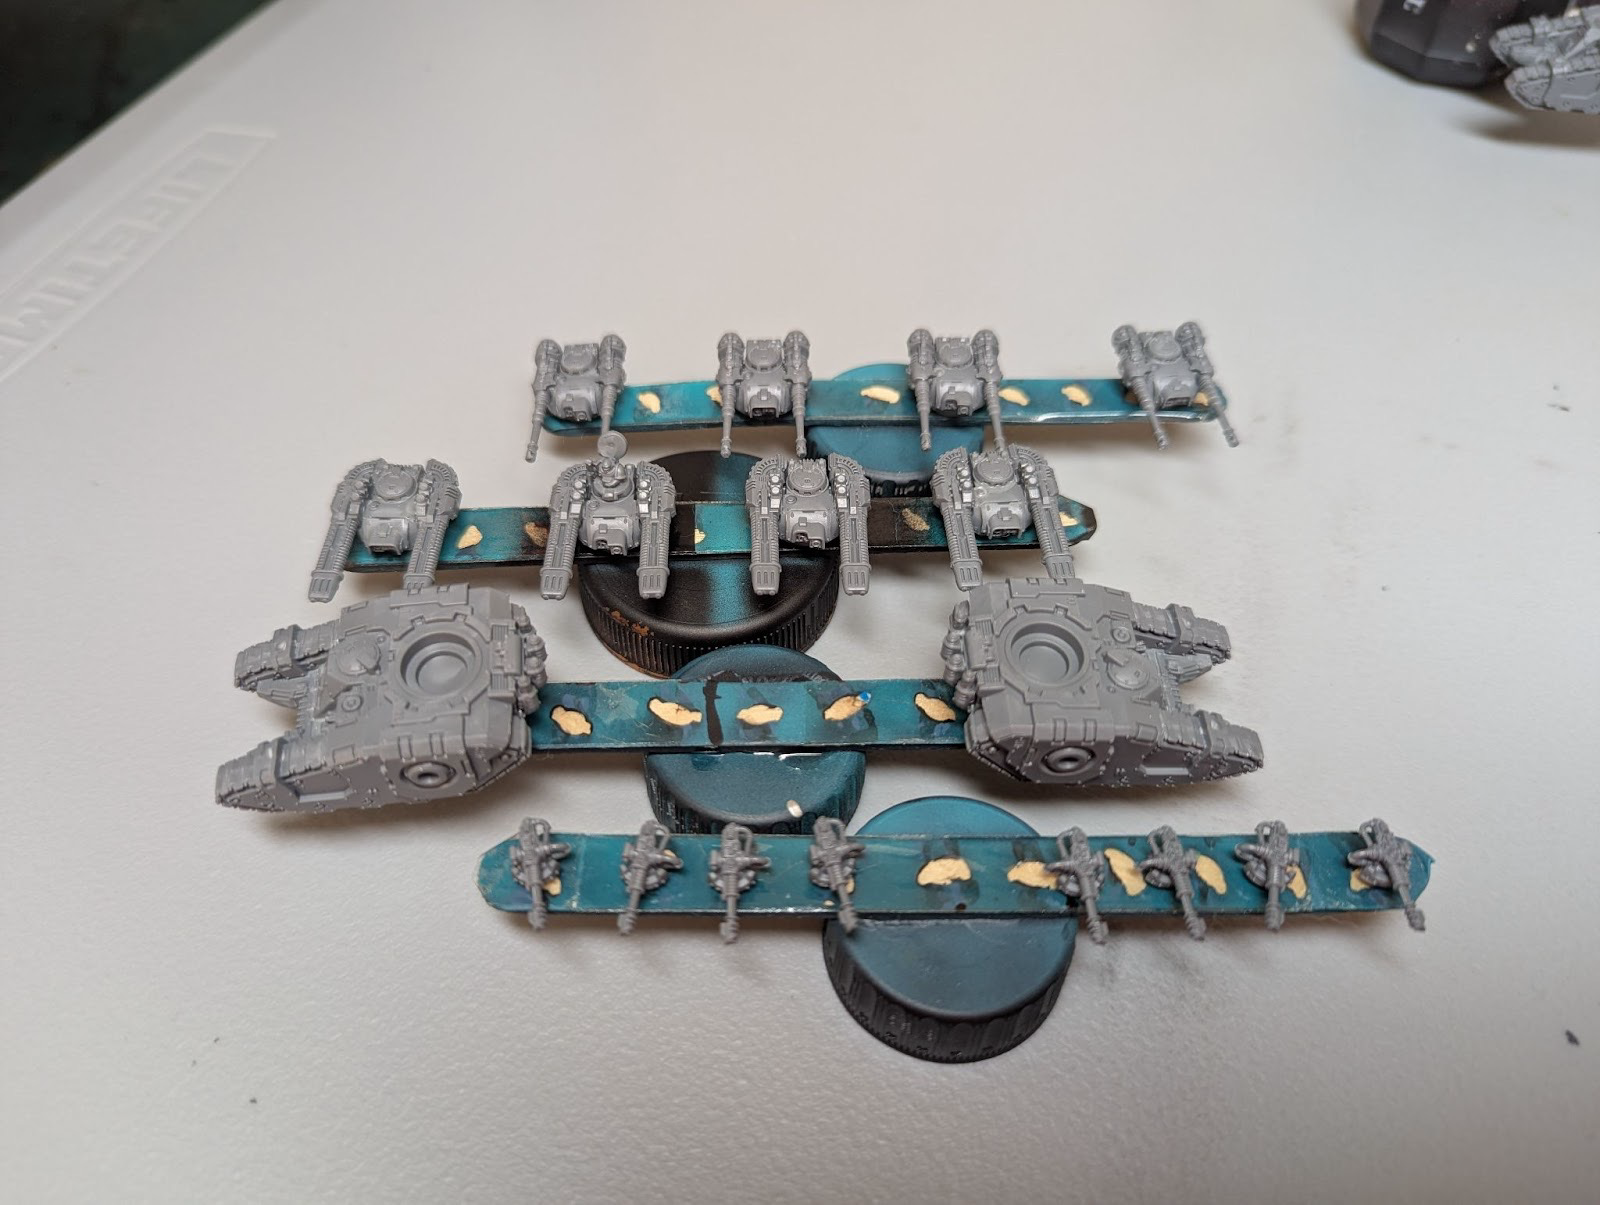
Each turret option is built and mounted separately since I plan to magnetize them. Sponsons are also subassembled, but there is no way in hell I’m magnetizing those. There are definitely loadout considerations for sponsons, but we’ll talk about list building another time. It’s worth noting that the actual main tank hulls are mounted on that goofy, triple-stacked “Tanks” assembly shown in the previous section. These extra stackings make sure that the bottom of the hull contacts the tape without the tracks also hitting the bottle cap.
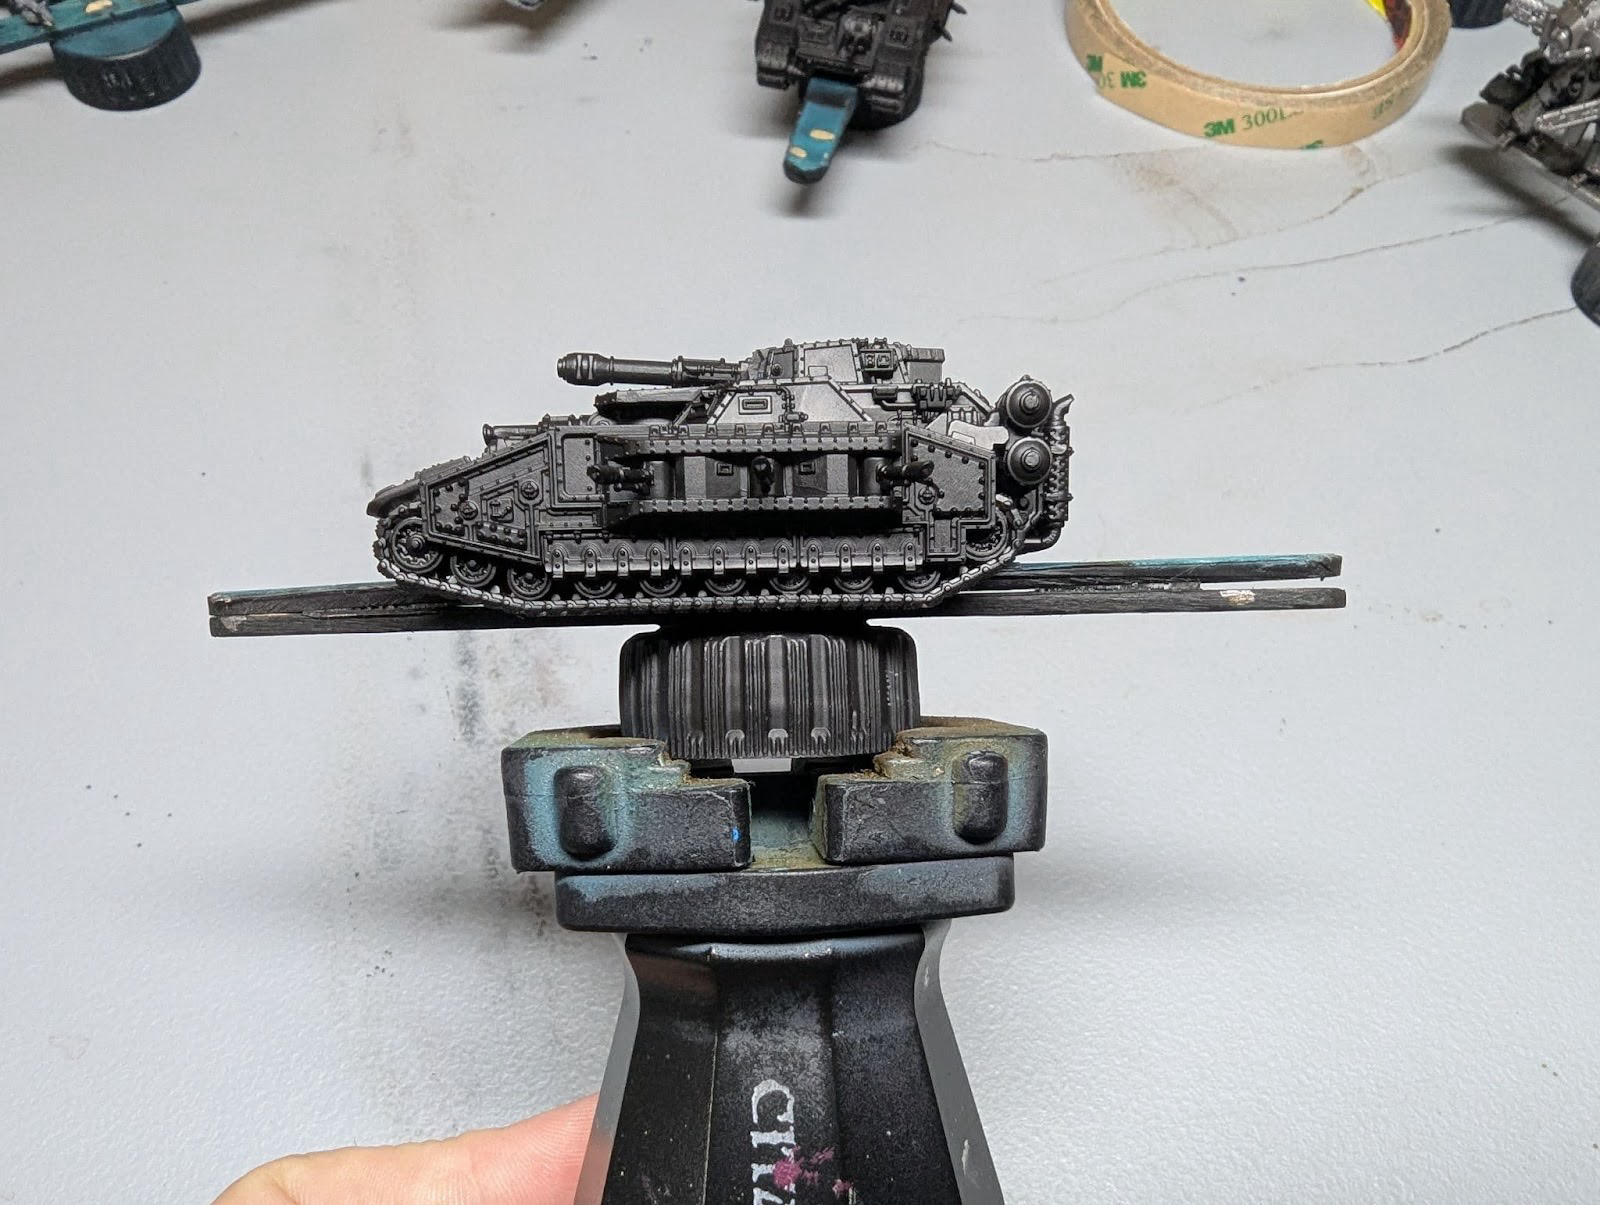
Another example of tank mounting is the Stormhammer below. Not only is this triple (or quadruple) stacked, it is alone on the assembly. Sometimes tanks just be big like that.
Prepping Knights, Fliers, Titans & Dark Mech Spiders
Knights are fairly simple to mount since you can use the same single-stick infantry assembly. Though it is worth putting the knight in the center for better balance–much like the stormhammer tank shown earlier. Fliers are a bit trickier and titans are a whole host of subassemblies and I’ll talk about these in another article. As for Mechanicum or Dark Mechanicum units, I don’t have much experience to offer and I’m not sure where I’d begin on the spider bots (good luck have fun).
Color Schemes & Basing
A spectacle is only spectacular if you can see it. This means that you need good contrast. These armies are small and the infantry are the size of Tic Tacs, after all. Unless you are painting a diorama with them, your scheme needs to read from 3 feet away (“gaming distance”). Not every edge between shapes will render, but make sure that any unit going on a base stands out from that base.
At this distance, I’ve found that value contrast (darks vs. lights) does 80% of the heavy lifting. So this means that Raven Guard, Iron Hands and Dark Angels players are fighting for readability from one end of the extreme. Don’t paint pure black and make sure to use lighter basing schemes. For White Scars, the opposite applies–don’t use pure white and use darker basing schemes. Otherwise follow good color harmony practices to avoid clashing saturated colors.
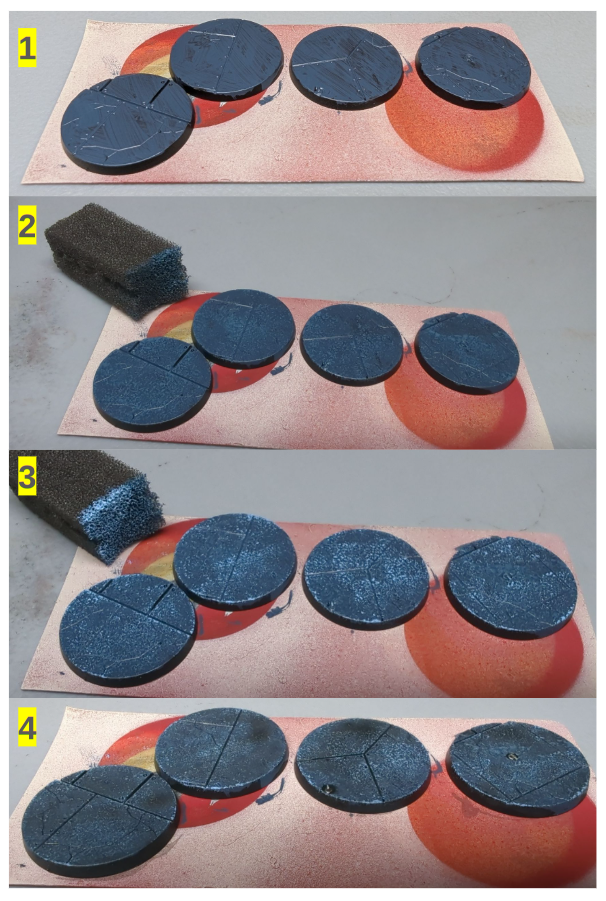
For my basing schemes, I keep it simple. This scale is not worth getting fancy, except for maybe knight or titan bases. Even then, most of your units will go on the tiny 25mm base and there is not a lot of room to do anything that will read at the 3 foot range. So to start, I recommend applying a 4mm x 1mm magnet with super glue to the bottom of each base. Then put them on a metal sheet or cookie tray for priming.

Next, I prime all of them black and start step 1 using Citadel Dark Reaper basecoats. I didn’t go for full coverage since I wanted some black to show through. Step 2 is sponge stippling with Citadel Thunderhawk Blue. This stippling is fairly delicate so I don’t overwhelm the first layer. Next I continue to add texture and highlights with stippled Pro Acryl Grey Blue (step 3). To finish it off, I cover any vents/hatches with silver and wash it all in Nuln Oil. You can base rim these black, but honestly I can’t easily spot which of mine are or are not rimmed from 3 feet away. If it will drive you to madness to not rim your bases, then do it. I’d rather paint more units.
In the next article, we’ll go through an example of painting assault infantry and mounting them to the bases. In case you are already done painting your infantry on the sticks, DO ONE THING: only put 4 assault marines or 4 terminators to one base. You’ll see pictures of these specialist infantry at 5 per base, but they look crowded like this and as you acquire more infantry boxes, you’ll get “free” bases of those infantry.
The last thing to note about color schemes is uniformity. Infantry tend to look best all uniformly painted. This also makes it easier to batch. For units like dreadnaughts, flyers and tanks, it is worth sprinkling in variations of livery, decals and markings. This adds a lot of life and lore to your army! For my Sons of Horus, I chose to keep my bikes, javelin speeders and jetbikes all uniform for simplicity, but certain White Scars players may choose to add individual markings or squad markings to each. How much you do for each unit type is up to you, but balance batch efficiency with details to keep cranking them out.
Using Common Techniques
What works at 28mm won’t work the same at 8mm scale. Veterans and greenhorns alike will learn something new by painting tiny hammer. I certainly learned a lot and had to paint differently when finishing 2500 points of various units. Let’s revisit common techniques and how they behave at tiny scale.
Airbrushing
Airbrushes are always nice to use, but I’ve found there are units for which it really makes a difference and those where it’s almost not worth the effort. Infantry is one of those former units. Airbrushing infantry on the sticks is perfect for laying down smooth consistent coats of the main armor color. For black or white armor colors, it helps establish subtle contrast too.
For tanks, I don’t think it is as effective. Anecdotedly, take a look at the seafoam armor of these two Sicarans. The left tank is painted with my traditional 28mm process of airbrush gradients, edge highlights and oil pinwashing. The right tank is sponged gradients from a makeup sponge and then details/edges highlighted with a makeup drybrush.

I’ll freely admit my airbrush gradient control at this scale is poor. So rather than spending more time and effort getting it right, switching to the sponging/drybrushing technique worked better. It’s also beautifully mindless to mash a sponge on the tank and get easy results.
For units between Infantry and Tanks–so bikes, walkers, etc.—you can still use an airbrush, or you can apply the other techniques. For flyers and titans, the airbrush techniques work as expected in the 28mm scale since they are larger models. Go ham.
Sponging
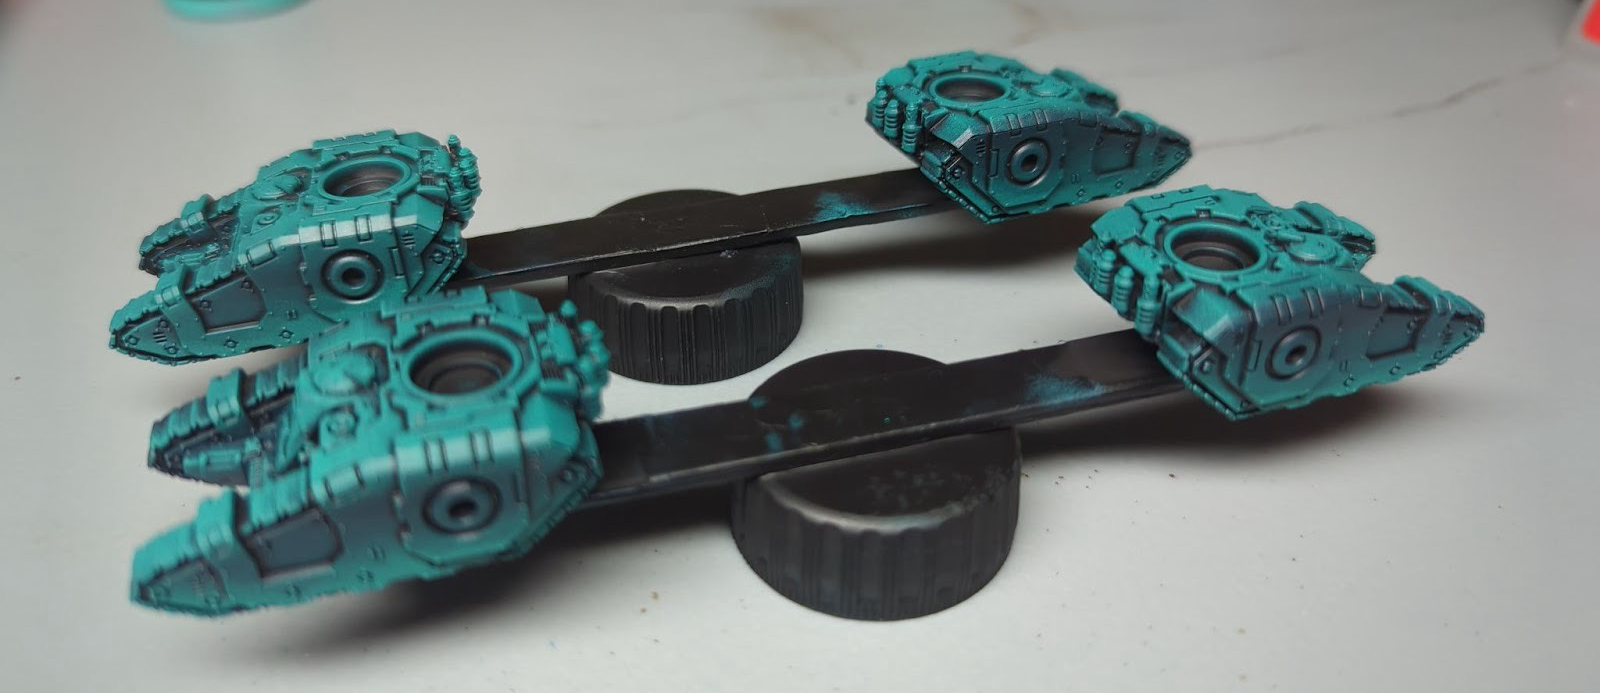
Using a small-pore, egg-shaped makeup sponge like these have unlocked many enjoyable painting sessions for my tiny motorpool. There are tons of great videos on how to use them for larger scale models, but when used on tiny tanks, fliers or even titans, the sponges are just plain fun to paint with. The only trick is to figure out the gradient of colors you want to build on the armor panels. For my Sons of Horus, I started with a black primer and then used an all over base coat of Pro Acryl Dark Jade (sponged on of course).
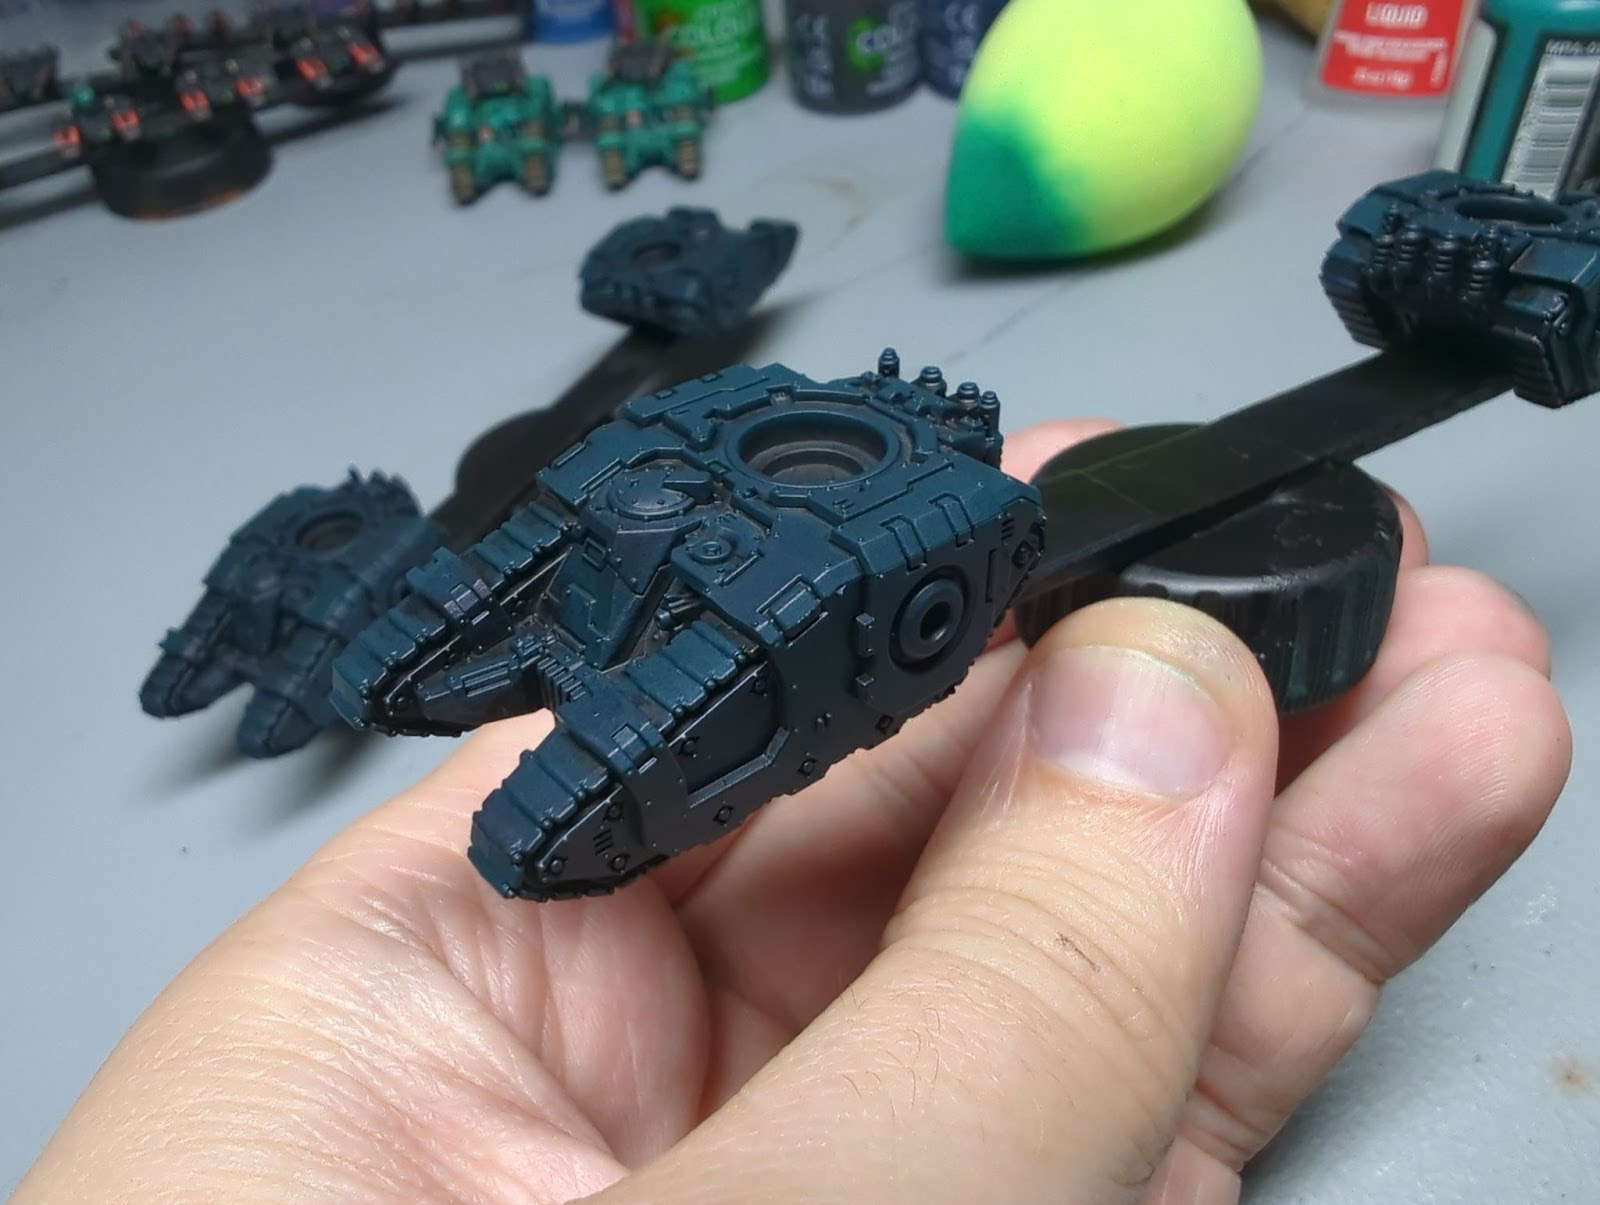
This mostly removes the black primer areas but leaves it in the deepest shadows your sponge naturally can’t reach. For a White Scars tank, I’d recommend starting with a mid-grey primer like Mechanicus Standard Grey. For other bright schemes like Imperial Fists, using Color Forge pink primer or Citadel Mephiston Red primer is useful for establishing the shadows. This step sets the foundation for sponging gradients on top of, but preserves key shadows. What’s even better is that this saves time, mess and cleanup from otherwise establishing those shadows with acrylic washes or oil pin washes. The absolute best part? It takes very few brain cells to mash the sponge onto the tank and get results. Important for when those Christmas ales hit you with some deceptive ABVs.
I’ll go into more detail on creating the sponge gradients in the next article with a more detailed look at painting these Sicarans. However, it is easy to get a feel for it just by playing around with the technique. You can always adjust your gradient or add back more of a particular tone by mashing the sponge with your desired color. An example of what the completed gradients look like is below:
Edge Highlighting vs. Drybrushing
This is only a debate when talking about models at least as large as a tank or maybe a dreadnought. Below that, units such as bikes, speeders and infantry don’t need either of these techniques to make them stand out. For units like tanks, edge highlighting at this scale is even more tedious and (at least for me) the effort-to-time payoff is not worth the result. Take a look at the earlier Sicaran comparison and zoom in on the turrets.
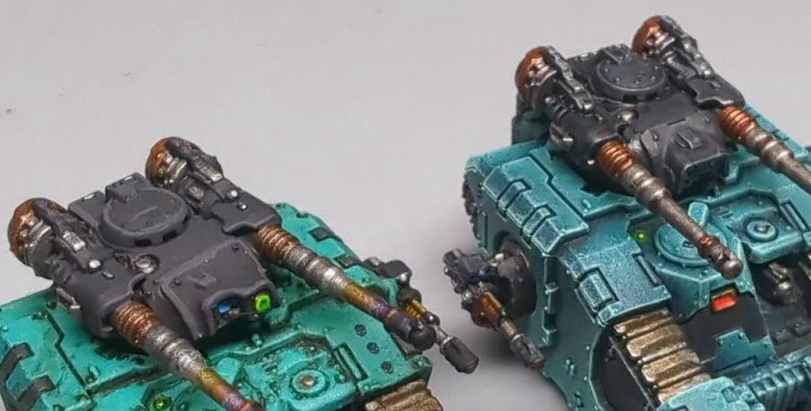
The left, “traditional” 28mm techniques like edge highlighting don’t look better than the drybrushed version on the right. To do edge highlighting well at 8mm, you need a tiny brush, tons of time and a hand that won’t cramp easily. It is very easy for the thickness of your brush strokes to push edge highlights into a cartoonish final product.
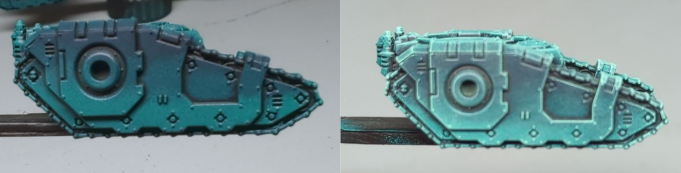
Drybrushing on the other hand, is a perfect way to delicately pick out all of the little edges, add some believable texture and do it all fast. A medium size makeup brush is great for capturing the edges on tanks. This easy technique pairs well with the mindless sponging techniques to add the highlights. Take a look at the following transformation from finished sponging (left) to finished drybrushing (right). It quickly goes from good to great.
When it comes to the turrets for the Sicarans, I can still easily repeat the steps of sponging to build the gradients of gray and then highlight with bright drybrushing. Below is a picture of the sponged and drybrushed turrets.
They may look very bright for a “black” color, but it is easy to tone it down with a 1:1 mix of Black Templar contrast paint and contrast medium.
Oil Paints
I would stay away from oils at this scale–at least for pin washing. It’s too hard to control and mistakes show up on a much larger percent of a model’s surface. Just look back at the “traditional techniques” Sicaran above. The sponging technique leaves shadows naturally so you don’t need to redefine them with oils. Using oils for dot filtering on titan panels is totally fair game though.
Contrast Paints
Contrast paints (and their ilk) are great at this scale, but mainly for their flow/viscosity. I wouldn’t necessarily recommend them for entire tank armor panels or even infantry due to their splotching on big surfaces, but they’re useful on lots of smaller details. The models have such small surface areas that any contrast-splotches are jarring. This same low surface area makes them fast to paint and if you want to experiment, go for it!
For high coverage paints like Citadel’s Black Templar, the flow out of the pot means that I can quickly block in details without spending a lot of time worrying about the paint’s consistency. Less management of the paints means quicker batches.
Another amazing use of contrast is for conveying glowy bits (plasma coils, search lights) and targeting lenses. For details that need to glow, undercoating with a pure white provides a good base. For something less inherently bright, undercoating with a bright silver is a good trick to get some variety. I often do this for weapon or turret lenses.
Washes
We all have a special place for washes like Nuln oil in our hearts. Or spilled on our desks. They primarily get used in 28mm paint jobs as an easy way to define shadows and recesses. On 8mm models, using them that way tends to waste more time than it is worth. Adding washes to your paint scheme multiplies your completion time by a big factor. Even factoring for drying time in a batch session, it is simply more trips between paint pot and model. Be mindful of adding this step and explore where it makes it a difference for you.
I find myself using washes for either breaking up large silver areas or tinting metals away from a basecoat of silver. An example of the latter is using sepia and earthen shades to achieve gold heatsinks for lascannons. For tank gun barrels or in the metal structure of knights, using Nuln Oil or a more dynamic shade like Citadel’s Targor Rageshade is a good idea to add visual variety.
Wrapping Up
Whew, there’s a lot to think about! Even if you’re not sure if you want to paint up a full army, this guide hopefully equipped you with helpful techniques to try painting a few tiny models. It’s a great way to take a break from your usual painting styles and experiment. As promised, I will show more detailed walk-throughs of painting up a batch of infantry and a batch of tanks. After that I want to talk a bit more about the list building in the game since it can be complex at first glance. All of this after BOLTERCON though (how is it already here???)…